Working with files
Files can be opened and downloaded within the window to select a file from the repository by double-clicking the left mouse button on a file inside the table or left-clicking on the icon in the far right column ('Open') next to that file.
Right-clicking on a file inside the table will open an options menu.
Options that can be selected are: 'Details', 'Download', 'Upload New Version', 'Delete', 'Rename', 'Permissions', 'Copy', 'Cut' and the 'Tools ..' menu. , within which we can select the 'Edit' or 'Export data archive' options.
Selecting the 'Details' option will open an 'Info' window with information about the document.
Selecting 'Download' will download the file to your computer within the folder set for download.
Selecting the 'Upload new version' option will open the 'Load document' window, which is the same as when entering documents into the process package. This option is used to upload a new version of a file from your computer to the repository. After selecting the file, and pressing the 'Save' button, the selected file will replace the file over which this option is selected.
Selecting the 'Delete' option is used to delete the selected repository file. Before deleting, a dialog box will open in which we can confirm the deletion of the file by pressing the 'Yes' button or reject it by pressing the 'No' button.
Selecting 'Rename' will open a window to rename the file. Entering a new name within the input field, and pressing the 'OK' button, will rename the selected file within the repository. Pressing the 'Cancel' button will close the window without making any changes.
Selecting the 'Permissions' option opens the 'Edit Permissions' window, which is used to edit permissions on specific files. This window is described under 'Edit file permissions'.
Files can be copied and transferred via the 'Cut', 'Copy' and 'Paste' options.
By selecting the 'Cut' option, the file is marked for transfer. By right-clicking on a specific folder, and selecting the 'Paste' option, the file will be moved to that folder. If you want to uncheck that a file is specified for transfer, you can do so by right-clicking on any folder or file and selecting the 'Paste: Discard' option.
By selecting the 'Copy' option, the file is marked for copying. By right-clicking on a specific folder, and selecting the 'Paste' option from the drop-down menu that opens by clicking on the '' toolbar window 'button, the file will be copied to that folder. If we want to uncheck that a file is specified for copying, we can do the same as when transferring - by right-clicking on any folder or file and selecting the 'Paste: Discard' option.
It is also possible to edit the contents of the files by right-clicking on the desired file and selecting the 'Edit' option from the 'Tools ...' menu. Depending on whether it is an HTML file or someone else, a window will open in which we can edit the html file or just the textual content of the file. Each of these windows in the lower right corner contains two buttons: 'Ok' to save the changes and 'Cancel' to close the window without making any changes.
Selecting the 'Export data archive' option will open a folder selection window within which the selected file compressed in .zip format will be placed. The window consists of two fields 'Folder path' in which the name of the folder in which the compressed file will be placed is displayed and 'File name' in which it is necessary to enter the name of the archive file. Clicking on the 'Browse' button will open a file selection window described in the subsection selecting a file from the repository and working with files.
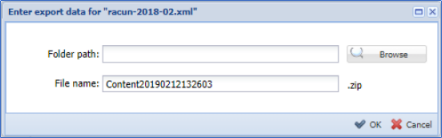
In the lower right corner of this window there are two buttons - 'Ok' to create a .zip file of the archive of the selected document and send notifications via e-mail, and 'Cancel' to close the window without changes.
Edit file permissions
File permissions can be edited within the file selection window, by right-clicking on a document within the document table, and by selecting the 'Permissions' option. Selecting this option will open the 'Edit Permissions' window, which consists of the permissions table and the toolbar on the right.
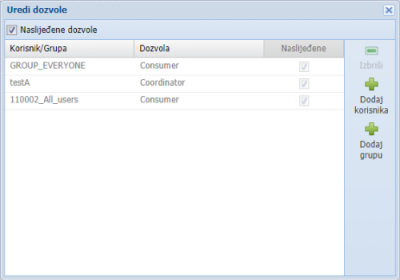
The table contains columns that display the permission data on the file: 'User / Group' (name of the user or group that has permission), 'Permission' and 'Inherited' - whether the permission is inherited.
Permits can be:
- 'Consumer' - has read-only rights, cannot create its own content.
- 'Coordinator' - has all the permissions over the entire content of the site, both what he created himself and what was created by other users of the site.
- 'Editor' - has the right to change file information, check files, can not create your own content.
- 'Contributor' - has all permissions on the entire content of the site they own, has no right to edit or delete content created by other users of the site.
- 'Collaborator' - has all permissions on the entire content of the site they own, has the right to edit but not delete content created by other users of the site.
At the top of the window is a box to check 'Inherited permissions'. Placing a check mark inside this box, in addition to all permissions set on the file, all inherited permissions will be displayed inside the table.
To the right is a toolbar that contains three buttons: 'Delete', 'Add User' and 'Add Group'.
Clicking the 'Delete' button, with the previously selected permission within the table, deletes that permission above the file. Before deleting, a dialog box will open in which we can confirm the deletion of the permission by pressing the 'Yes' button or reject by pressing the 'No' button.
Clicking on the 'Add User' button will open the 'Permission Form' window with the form for entering the permit.

The form consists of two fields - 'Permission', for selecting a permit and 'User', for selecting the user who will have that permit. Clicking the arrow to the right under 'User' opens the 'Select Users' window. In the lower left corner of the window there are two buttons - 'Save' to set the entered permission and 'Cancel' to close the window without changes.
Clicking on the 'Add Group' button will open the 'Permission Form' window with the permit entry form.

The form consists of two fields - 'Permission' (to select a license) and 'Group', to select a group of users who will have that license. Clicking the arrow to the right under 'Group' opens the 'Select Groups' window. In the lower left corner of the window there are two buttons - 'Save' to set the entered permission and 'Cancel' to close the window without changes.