Partner administration
The partner administration user interface is opened by clicking on the 'Administrator' button on the toolbar and selecting the 'Partners' option. The user interface consists of a table and a toolbar, located on the right, and a 'Partner' search box, located above the table.
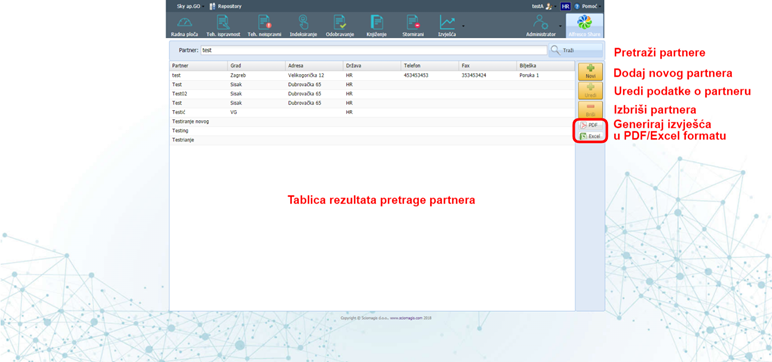
Partners are searched by entering text in the 'Partner' field and clicking on the 'Search' button, located to the right of that field. The search results will be displayed in the table below.
The table consists of the following columns:
• 'Partner' - the name of the partner • 'City' - the city in which the partner's registered office is located • 'Address' - the address of the partner • 'Country' - the country in which the partner's registered office is located • 'Phone' - contact phone number • 'Fax' - fax contact number • 'Note' - a note related to the partner
It is possible to place the display of columns' ID '(unique partner identification number),' OIB '(personal identification number),' Ref. ID '(internal identification number),' Contact person 'and' IBAN '(partner's bank account number). The toolbar consists of the following buttons: 'New', 'Edit', 'Delete', and 'Pdf' and 'Excel'. Clicking the 'New' button on the toolbar will open a window for entering a new partner, which is described in the chapter inserting a new partner. Clicking on the 'Edit' button, next to the previously marked partner in the table, will open a window in which the entered data for that partner will be edited. This window is described in the section editing partner data. Pressing the 'Delete' button, next to the previously marked partner in the table, deletes the partner. Before deleting, the application will ask you to confirm whether we want to delete that partner safely. Pressing 'Yes' confirms the deletion, while pressing 'Cancel' closes the window without changes.
Generate report files
There are two more buttons on the toolbar: 'PDF' and 'Excel'. These buttons are used to generate reports on search results in PDF or Excel format, depending on which button the user clicked. The reports you create contain data that is inside the search table.
Inserting a new partner
The new partner insertion window opens inside the partner administration interface by clicking on the 'New' button, located on the toolbar on the right.
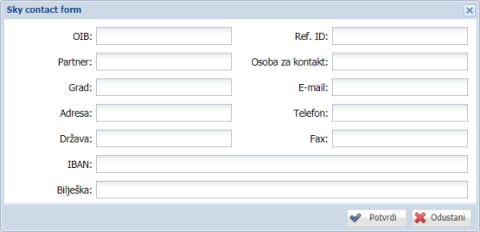
The window consists of a data entry form that contains the following fields:
• 'OIB' - personal identification number of the partner
• 'Ref. ID '- internal identification number of the partner
• 'Partner' - The name of the partner
• 'Contact person'
• 'City' - the city in which the partner's registered office is located
• 'Address' - the address of the partner
• 'Country' - the country in which the partner's registered office is located
• 'E-mail' - E-mail address of the partner
• 'Phone' - contact phone number of the partner
• 'Fax' - fax contact number
• 'IBAN' - partner's bank account number
• 'Note' - a note related to the partner
There are two buttons in the lower right corner of the window: 'Confirm', to save the changes, and 'Cancel', to reject the new entry.
Edit partner information
The Partner Edit window opens inside the Partner Administration interface by clicking the 'Edit' button, located on the toolbar on the right, next to the previously selected partner within the table.
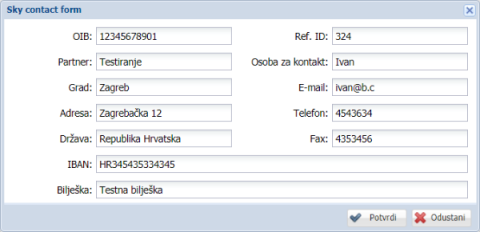
The window consists of a data entry form, which is the same as when entering a new partner and is described in the section Inserting a new partner.
There are two buttons in the lower right corner of the window: 'Confirm', to save all changes to partner information, and 'Cancel', to discard changes to the partner.
Importing partners from file
Use 'Import' button from toolbar on the right to open partner import window. Partner import window has four fields
- Company - select company to associate partners data
- Import type - type of data file - more information below
- File - file from your computer with partner data
- Company Overwrite - If check company ID from file is used insted of selected company from this form. Use 'Upload Document' to import data to Sky.Flow.
Sky.Flow will use ERP ID (see below) to try to match records in Sky.Flow with uploaded data. If match is found record will be updated.
JSON file with partners
JSON file is formated as a single array with each object representing one partner. Example:
[
    {
        "companyId":'1', // Company identification on Sky.Flow
        "contactAddress":'Partner address',
        "contactCity":'Partner City',
        "contactCountry":'Partner Country',
        "contactErpId":'9999999', // Partner ID in your ERP system
        "contactName":'Partner Name',
        "contactTel":'Partner Phone number',
        "contactFax":'Partner Fax number',
        "contactNote":'Partner note',
        "contactContactPerson": 'Partner Contact',
        "contactVatId":'Partner VAT ID',
        "contactIban":'Partner IBAN',
        "contactRefId": 'Partner reference number' // in your ERP system
    },
    ...
]
Point/Oracle import
Point/Oracle export option uses XML data file exported from Point application. Sky.Flow will look for XML element named '' for partner data
<G_PP>
   <NAZIV>Sciomagis</NAZIV><!-- maps to JSON contactName-->
   <POSTA>10410</POSTA> <!-- maps to JSON contactCity-->
   <MJESTO>Velika Gorica</MJESTO> <!-- maps to JSON contactCity-->
   <ADRESA>Partner address</ADRESA><!-- maps to JSON contactAddress-->
   <MAT_BROJ>My ref</MAT_BROJ><!-- maps to JSON contactRefId-->
</G_PP>