Choosing a partner
The Partner Selection window consists of a partner search results table, a toolbar on the right, and a search box, located above the table.
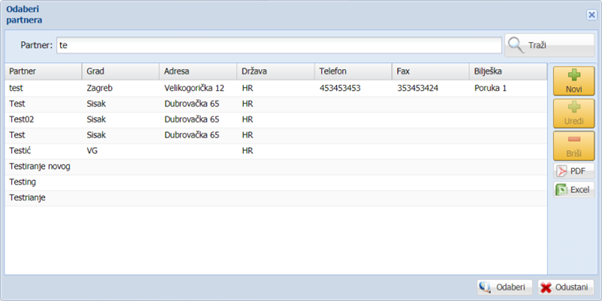
The search is done by entering text in the search field and clicking on the 'Search' button, located to the right of that field. All partners whose name begins with the entered text are searched, regardless of lowercase and uppercase letters. The search results will be displayed inside the table.
Selecting a partner is done by left-clicking on the partner within the table, and pressing the 'Select' button, located in the lower right part of the window.
The toolbar consists of buttons' New ',' Edit ', Delete', and buttons for generating documents' PDF 'and' Excel '.
Pressing the 'New' button will open a window for entering a new partner. This window consists of a form for entering data to the partner is described in detail in the sub-chapter 'Entering a new partner'.
Clicking the 'Edit' button will open a window for modifying partner information. This window consists of a partner data entry form and is described in detail in the section 'Changing partner data'.
Pressing the 'Delete' button starts deleting the previously selected partner within the table. Before deleting, a dialog box will open in which we can confirm the deletion of the role by pressing the 'Yes' button or reject by pressing the 'Cancel' button.
By clicking on the 'PDF' or 'Excel' button, a pdf or Excel document will be generated with a table containing information about the search partners.
In the lower right part of the window there are two buttons - 'Select' and 'Cancel'. Pressing the 'Select' button, next to the previously selected partner within the table, selects the partner and closes the window. Pressing the 'Cancel' button closes the window without selecting a partner.
Enter a new partner
The new partner entry window is opened by clicking on the 'New' button on the toolbar within the partner selection window.
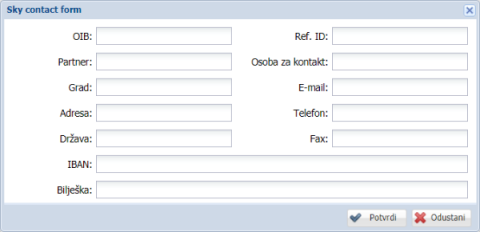
The window consists of a data entry form that contains the following fields:
- 'OIB' - personal identification number of the partner
- 'Ref. ID '- internal identification number of the partner
- 'Partner' - Name of the partner
- 'Contact person'
- 'City' - the city in which the partner's registered office is located
- 'Address' - partner's address
- 'Country' - the country in which the partner's registered office is located
- 'E-mail' - E-mail address of the partner
- 'Phone' - contact phone number of the partner
- 'Fax' - contact fax number
- 'IBAN' - partner's bank account number
- 'Note' - a note related to the partner
There are two buttons in the lower right corner of the window: 'Confirm', to save the changes, and 'Cancel', to reject the new entry.
Partner data changes
The partner data change window opens by clicking the 'Edit' button on the toolbar within the partner selection window.
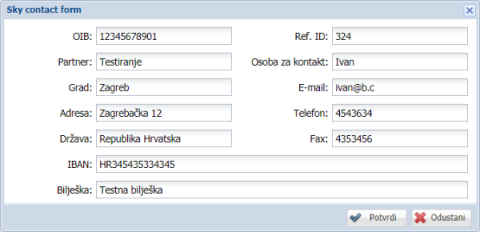
The window consists of a data entry form, which is the same as when entering a new partner and is described in the section Inserting a new partner.
There are two buttons in the lower right corner of the window: 'Confirm', to save all changes to partner information, and 'Cancel', to discard changes to the partner.