Companies setup
The business administration user interface is opened by clicking on the 'Admin' button on the toolbar and selecting the 'Companies setup' option, which is located under the 'Designer' menu. The user interface consists of a table and a toolbar, located on the right.
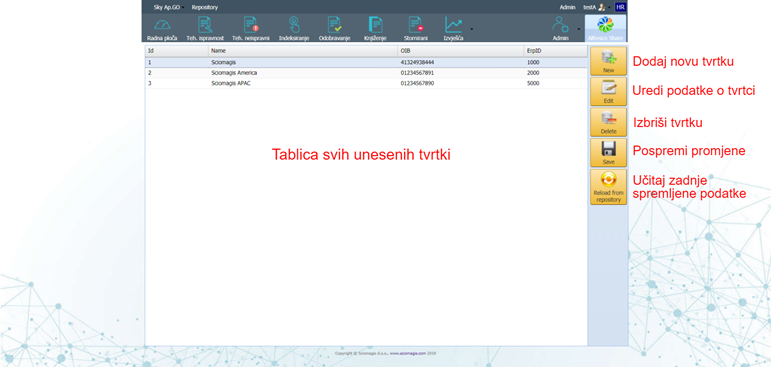
The table consists of the following columns:
- 'Id' - Company identification number
- 'Name' - Company name
- 'OIB' - OIB of the company
- 'ErpID' - erpID company number
The toolbar consists of the following buttons 'New', 'Edit', 'Delete', 'Save' and 'Reload from repository'.
Setting up a new company
Pressing the 'New' button adds a new company within the table with the automatically generated ID, name and ErpID number, while the OIB data remains blank.
Editing company data
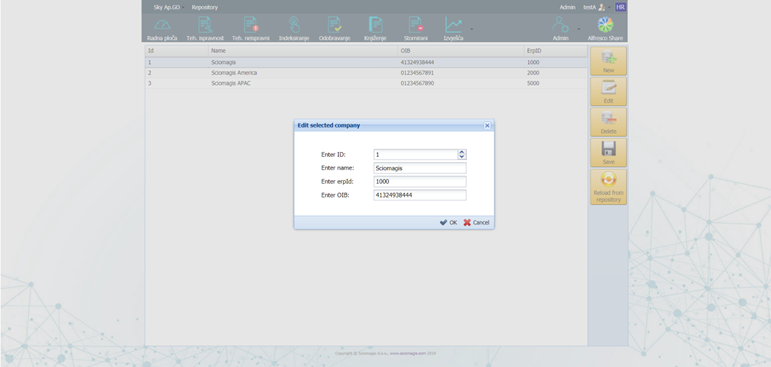
Clicking on the 'Edit' button next to the previously selected company within the table opens the 'Edit selected company' window in which the data is edited. The window consists of a data entry form that contains the following fields:
- 'Enter ID' - change the company ID
- 'Enter name' - change the company name
- 'Enter erpId' - change the erpID company number
- 'Enter OIB' - change of company OIB
In the lower right corner of the window there are two buttons - 'OK' and 'Cancel'. Pressing the 'OK' button saves the entered changes, while pressing 'Cancel' closes the window without changes.
Deleting a company
The company, once highlighted in the table, can be deleted by pressing the ‘Delete’ button on the toolbar. Before deleting, the application will ask you to confirm whether we want to delete this business safely. Pressing 'Yes' confirms the deletion, while pressing 'Cancel' closes the window and nothing changes.
Saving and loading
All cost center changes are saved by clicking the 'Save' button on the toolbar.
By pressing the 'Reload from repository' button, the data about the companies that were last saved is loaded. Before loading, the application will ask for confirmation to discard all changes and load the last saved state. Pressing 'Yes' will load the last saved state, while pressing 'Cancel' closes the window and nothing changes.