Administrator page
The admin page opens by selecting the 'Administrator' option within the drop-down menu for working with the user account.
The user interface is divided into two tabs - ‘Administrator’ and ‘System’.
Card - Administrator
Within the "Administrator" tab, there are five sections: "Change user password", "Desktop message", "Add new users to the organization", "Archive paths" and "Usage data". Clicking on a section name or the arrow in front of the name will expand the section and the options associated with it will be displayed.
Change user password
The 'Change user password' section is used to change the user's password. It consists of a data entry form that contains the fields 'Pwd change user', in which you need to enter the username of the user to whom you want to change the password, and 'New pwd', in which you need to enter a new password. By clicking on the 'Change password' button, located below these input fields, the password of the entered user will be changed.

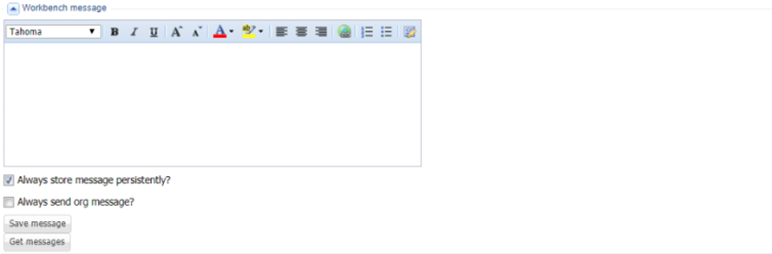
Workbench message
The 'Workbench message' section consists of a data entry form which is containing a text editor and two checkboxes. 'Always store message persistently 'and 'Always send org message'. By entering a text message and pressing the 'Save message' button, a message will be saved and displayed on the desktop.
Pressing the "Get messages" button will retrieve the saved message and display it inside the text editor.
Add new users to organization
The "Add new users to organization" section is used to add new users within organizations. It consists of an entry form containing the following fields:
'Organization id' - A unique identifier of the organization within which new users are added 'Login id' - username 'Password' - Password 'Firstname' - first name 'Lastname' - surname 'Email' - e-mail address of the user
By entering all the data, and pressing the 'Add user' button, the user will be added to the organization and will be able to log in to the application.
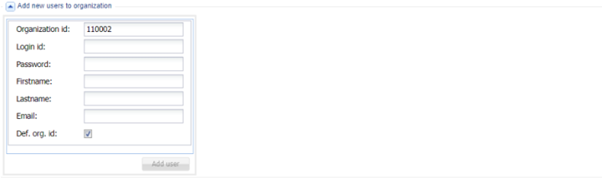
The form also contains one check box 'Def. org. id '(default organization id). If this box is checked, this organization will be set as the initial organization for the new user after successful login.
Path Archive
The "Archive Paths" section is used to set the paths where documents will be stored when performing tasks. It consists of a form containing the following fields:
- 'Approved' - the path to which account files will be saved after approval
- 'Approved other' - the path to which will be placed additional files in the process package, after approval
- 'Tech. incorrect'- paths in which technically incorrect invoices will be stored
- 'Cancellation other' - the path where the files will be placed to in the process package after the account is reversed
It also contains two check boxes:
'Owner as consumer', in which a check mark sets the owner of the file as consumer, and 'Filter dat. names', which is checked if the file names will be filtered
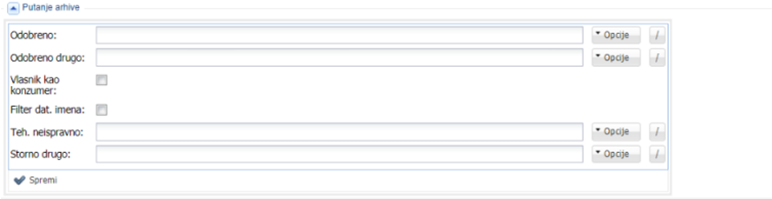
The path can also be entered manually using the 'Options' drop-down menu and the '/' separator button. By pressing the 'Options' drop-down menu, it is possible to select one of the offered options:
- 'Add business' - added at the end of the class path code indicating the company name "$ {CN}"
- 'Add file name' - added at the end of the class path code indicating the full file name "$ {FILENAME}
- 'Add file name without extension' - added at the end of the class path code indicating the file name without extension "$ {FILENAMEBASE}"
- 'Add file extension' - code is added at the end of the path of the class indicating the file extension "$ {FILENAMEEXT}"
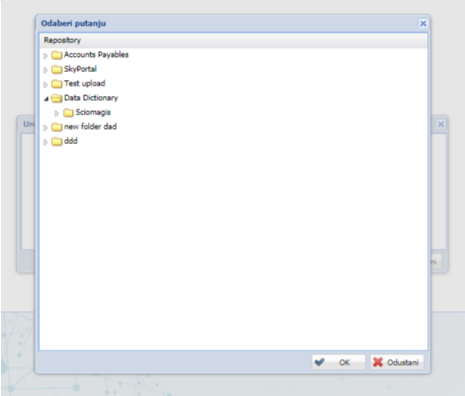
- 'Add Folder' - opens the 'Select Path' window. This window shows the structure of the folders within the repository, which is displayed in the click of a tree with nodes displaying the folders. The folder is highlighted by left-clicking computer mouse on the desired folder. In the lower right corner of the window there are two buttons - "OK" and "Cancel". Clicking the 'OK' button will place the entire folder path in the 'Path' field at the end of the class path. Pressing 'Cancel' will close the folder selection window without any changes
- 'Add separator' - is added to the end of the path of the separator label class "/"
- 'Add creation year' - added to the end of the class path code indicating the creation year of the file "$ {Y}"
- 'Add creation month' - added to the end of the class path code indicating the creation month of the file "${M}"
- 'Add creation day' - added at the end of the class path code indicating the creation day of the file "${D}"
- 'Add root class name' - added at the end of the class path code indicating the root class name "$ {TT}"
- 'Add full class name' - added at the end of the class path code indicating the full class name "$ {TS}"
- 'Add class name' - added at the end of the class path code indicating the class name "$ {TC}"
- 'Add Partner Name' - added at the end of the class path code indicating the partner name "$ {PN}"
Pressing the separator button '/' adds the separator label "/" to the end of the class path
Usage data
The "Usage Data" section displays basic information about currently loaded data and the number of users within the organization.
Card - System
Within the 'System' tab there are two sections 'Configuration loading' and 'Add existing users to organization'. Clicking on a section name or the arrow in front of the name will expand the section and the options associated with it will be displayed.
Configuration loading
The 'Configuration loading' section consists of three buttons:
- 'Reload config' - reload configurations
- 'Reload alfresco config' -reload alfresco configurations
- 'Clear all mem-cached data' - delete all data stored in the cache

Add existing users to organization
The 'Add existing users to organization' section is used to add existing users to the organization. It consists of an input form that contains the following fields:
- 'Organization id' - A unique identifier of the organization within which existing users are added
- 'Login id' - clicking on this field will open a user selection window, which is described in detail in the chapter User selection window
- The form also contains one check box 'Def. org. id '(Default organization id). If this box is checked, this organization will be set as the initial organization of the selected user after successful login
