Account chart administration
The user account administration interface opens by clicking on the 'Administrator' button on the toolbar and selecting the 'Chart of Accounts' option. The user interface consists of a table and a toolbar, located on the right.
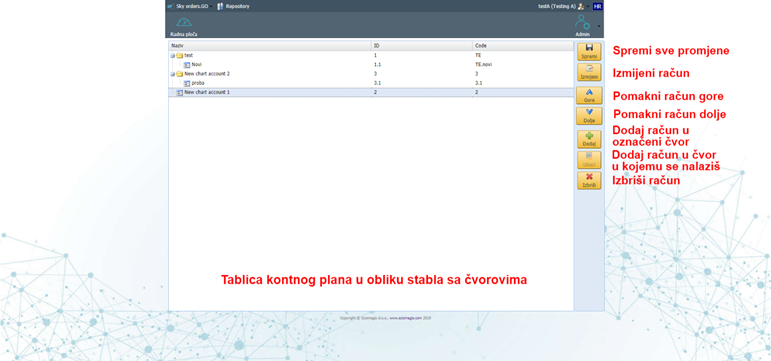
The table consists of a tree with nodes that denote accounts. It is divided into the following columns:
- Name '- account name
- 'ID' - unique identification code of the account
- 'Code' - account code
The toolbar consists of the following buttons 'Save', 'Edit', 'Up', 'Down', 'Add', 'Insert' and 'Delete'.
Setting up a new account
A new account can be inserted in two ways. The first way is by pressing the 'Add' button, which places the new account inside the same node as the marked node / account (or in the root node if nothing is marked).
Clicking the 'Insert' button will insert a new account within the node marked. If a node to which new accounts cannot be inserted is selected (if it is an account), this button will be disabled.
In both cases, a new account with an automatically generated ID and code will be created and a window for editing account information will open.
Edit account information
Clicking on the 'Edit' button, next to the previously marked account within the table, opens the 'Edit Chart of Accounts' window in which the data is edited.
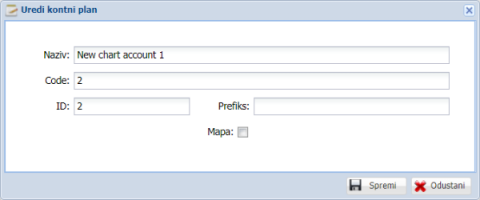
This window consists of a data entry form that contains the following fields:
- 'Name' - change the name of the account
- 'Code' - change the unique code that identifies the account
- 'ID' - change of unique account code (last code)
- 'Prefix' - Unable to change, displays the complete ID of the node within which the account / node being changed is located
- 'Folder' - a box in which a tick is placed if we want to mark a node as a folder within which other nodes / accounts can be placed
In the lower right corner of the window there are two buttons - 'Save' and 'Cancel'. Clicking on the 'Save' button saves the entered changes, while pressing 'Cancel' closes the window without changes.
Change the position of an account or node
A node or account can be moved in two ways. The first way is via the 'Up' and 'Down' buttons on the toolbar. By pressing these buttons, the highlighted node will move one place up or down within the node in which it is located.
Another way to move the nodes is to drag and drop. By pressing and holding the left mouse button on a particular node, dragging it to where we want it to be, and releasing the mouse button, the node will move, and a unique tag (ID) will be generated automatically. Here you should pay attention to the unique code 'Code', which will remain unchanged, and it should be changed after scrolling.
Delete an account or node
A node or account, once highlighted within a table, can be deleted by clicking the 'Delete' button on the toolbar. If there are other nodes or accounts inside the node, deletion will not be allowed until all internal nodes and accounts have been deleted.
Saving
All changes to purchase order groups are saved by clicking the 'Save' button on the toolbar.