Process approval changes
The process approval change window opens within the workflow administration interface by pressing one of the three buttons on the right toolbar: 'Edit apApprove' (approval approval, 'Edit approvals: Approve' window opens), 'Edit apStorno' (reversal approval, the 'Edit approvals: Cancel' window opens) and 'Edit aoCheckBooks' (posting approval, the 'Edit approvals: CheckBooks' edit window opens). All these windows have the same interface and the same functionalities.
The approval change window consists of an approval table and a toolbar on the right.
The approval table consists of the following columns:
- 'Assignee' - the user in charge of the task
- 'Candidate users' - candidates, users who can complete the task
- 'Description' - description
- 'Duration' - the duration of the approval task
- Within the table it is possible to set the display of the column 'Transitions order', which indicates the order of transitions.
Inside the table below each row showing the approval, a text is displayed indicating the candidates (users who can complete the task), and groups of candidates (names of groups of users who can complete the task, followed by users within those groups).
Add new approval

New approval is added by clicking on the 'Add' button, located on the toolbar on the right. Clicking this button opens the 'Edit approval data' window, which consists of a data entry form with the following fields:
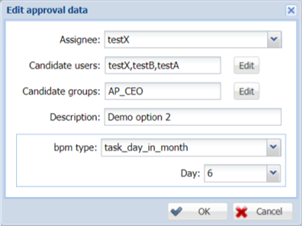
- 'Assignee' - selection of the user who will be in charge of the task. Clicking on this field opens the user selection window, which is described in the single user selection chapter.
- 'Candidate users' - selection of users who will be able to be in charge of the task. Pressing the 'Edit' button, located to the right of the field, will open a multi-user search and selection window. The window is described within the chapter selecting multiple users.
- 'Candidate groups' - selection of groups whose users will be able to be in charge of the task. Pressing the 'Edit' button, located to the right of the field, will open the group selection window, which is described in the candidate group selection section.
- 'Description' - description of the approval
- 'bpm type' - deadline for completing the task. Under 'bpm type' you can select three options: 'task_create_offset' (time for which the task should be done), 'wf_create_offset' (time for which the workflow should be done) and 'task_day_in_month' until which date in the month the task should be done ). Selecting the first two options ('task_create_offset' or 'wf_create_offset') below this field will allow you to enter the number of days (first field) and hours (second field) for executing the task from the drop-down menu under 'Days / Hours'. ) or workflow ('wf_create_offset'), as shown in the figure above. The number of days can be from 0 to 31 and the hours from 0 to 23. By selecting the third option, 'task_day_in_month', to the right of this field you will be able to select under 'Day' from the drop-down menu is shown in the figure below. The day can be from the 1st to the 31st of the month. Pressing the 'OK' button saves the data and pressing 'Cancel' discards it.
There are two buttons in the lower right corner of the window: 'Save changes', to save the changes, and 'Cancel', to discard the changes.
Approval changes
.png)
The approval data can be changed by pressing the 'Edit' button with the previously marked approval in the table. Clicking this button opens the 'Edit approval data' window. The functionalities in this window are the same as when entering a new approval.
Changes to the terms of the approval
The approval conditions can be changed by clicking on the 'Edit conditions' button with the previously marked approval in the table. Clicking this button opens the 'Edit process conditions on Approve' window in which the conditions for the marked approval are edited.
This window has the same functionality as the window when changing process conditions.
In the lower right corner of the window there are two buttons, 'OK' to save all entered changes, and a 'Cancel' button to discard all changes.
Delete approval
The approval can be deleted by pressing the 'Remove' button, with the approval marked in the table below.